DEEP CYCLE BATTERIES and BUSH POWER

Prospecting Australia

Help Support Prospecting Australia:

This site may earn a commission from merchant affiliate links, including eBay, Amazon, and others.
Jaros said:
Do you think you will need to get into Internal Resistances? :|

Haven't thought that far ahead, plus it may be getting a little too technical for the layman.

I'm putting all of this together on the fly.

Gotta go out now back later tonite
 
condot22
Thanks very much for your efforts ...
In putting this in simple terms for the layman...
I am learning a lot ....
I am going to put a system in the cruser ....

Cheers Nanjim
Jim
 
Jim, your thanks are appreciated, they and the other votes make my efforts a worthwhile exercise.

Mike

Ooops, likewise to Westaus
 
Next In vehicle auxiliary power....with some options to send power to a tent, pros and cons.

This will only be one of many ways to do this, it doesn't mean it is any better or worse than other methods out there, but, perhaps the way I would chose to do it.
 
This next post covers vehicle power.

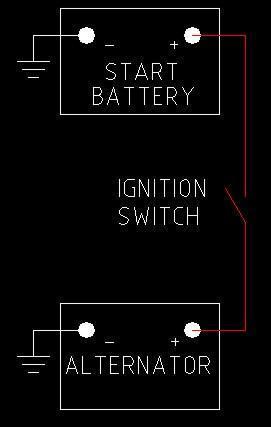
1416148124_car1.jpg


This is a simple block diagram, it does not include fuses, relays solenoids, the starter motor etc. It shows simply that when the IGN is off the battery is disconnected from the alternator.

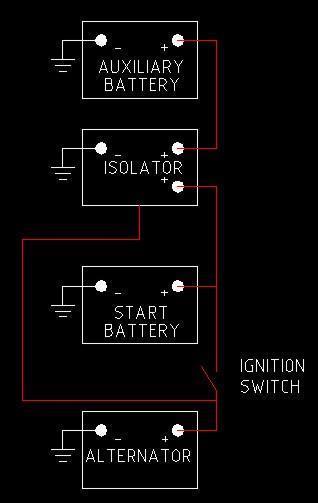
The next image shows the addition of a second battery and an isolator (in principle)

1416148282_car2.jpg


When IGN is on the isolator allows the alternator to charge both batteries. The issues that deter me from ever doing this are;

I don't like charging anything directly from the alternator other than a CCA battery and if this is what the auxiliary is, then it's not the best option for continuous low amp supply. If it's a deep cycle then a lead acid is the only one that I might use. But they, GEL & AGM batteries need a different charging cycle to a CCA.

The other thing is that I would not recommend putting an AGM under the hood, the environment (heat) could well cause problems.

(That is the main reason I put my AGM in the rear storage and close to the charger and the fridge, so no voltage drop problems and it's out of the weather and water. But it is your choice after all)
 
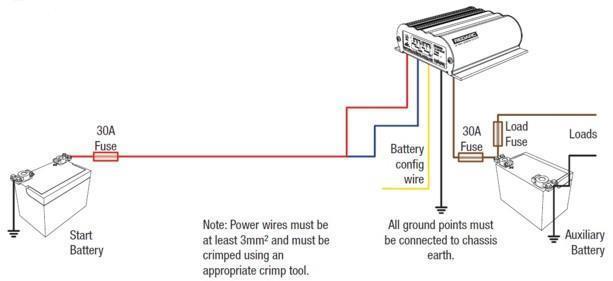
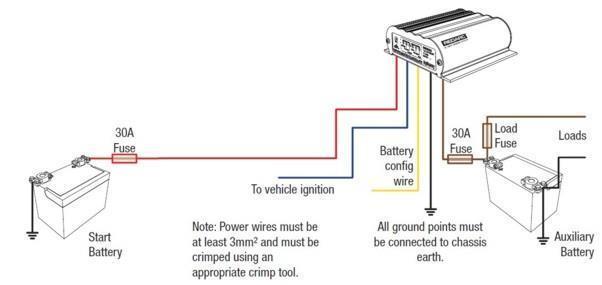
Rather than draw up a circuit for a smart charger the following 2 diagrams are from the Redarc BCDC range of chargers, other brands will be similar.

In the first diagram the Blue wire is connected to the source positive, i.e. the start battery. In this model the charger senses the threshold of input volts and automatically switches the charger off if the start battery is at risk of not starting the car.

In the second diagram, this model's blue wire is connected to the IGN switch so that when the car is off, so is the charger. (This is the version I used)

1416149147_redarc1.jpg


1416149159_redarc2.jpg


I'll explain the battery configuration wire next post.
 
The battery configuration wire is an Orange wire it is connected as per the table below

1416149415_redarc3.jpg


Next post - how to incorporate solar into a car system and provide power to a van or camper.
 
Solar - In Vehicle

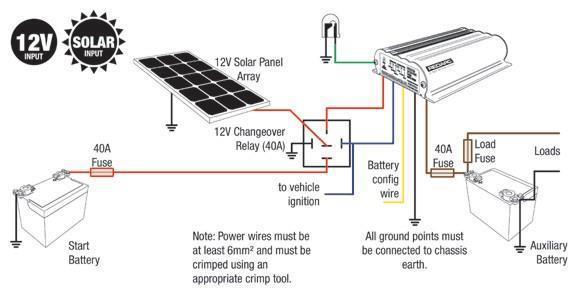
The idea with this is that when the ignition is off, the solar array is connected through the charger regulator. When Ignition is on the solar disconnects and the charger behaves in a similar way to the previous Redarc chargers. With this device you only need the one device, not a separate charger and solar regulator.

1416198726_redarc3.jpg
 
There are a number of pros and cons re solar and how you use them......

Fixed panel/s on the roof of a camper, caravan or car -

Pro - Once installed no more work to set it up. More secure.
Con - You need to park in the sun, so the whole van or vehicle is in the sun and if on a roof rack you lose the carry space. Usually mounted horizontal (not the best angle to maximise output).

Portable folding panel -

Pro - You can park in the shade and run the cable to the panel which is in the sun. Allows you to move to face the sun 3-4 times a day and angled from horizontal.
Con - You need to carry the panel somewhere, its less secure and takes more effort to set up.

Plus, beware the gum tree if parking in shade.
 
I use a 110 W concertina folding panel, it's light weight, it's controller is separate to the car charger, it fits down the side of my fridge when travelling and not in use and drapes over the windscreen when in use (the benefits here, its angle is better than flat, it acts as a sunshade, its off the ground and I can lock it to the roof rack.

With a heavy duty 10M double Anderson plug extension lead, I can leave it on the car and feed power to the van battery.

This is just one way of many, but shows you need to think about what you want and how to achieve it.

In summary.

  • Work out your need for power first, you do it with water i.e. how much do the tanks or jerries hold, how long will it last and where do I refill them.[/*]
  • 12 volt power is the same.[/*]
  • Remember to keep your demand to 25-30% of battery size i.e 25 to 30 AH from a 100AH battery. This maximises cycle life.[/*]
  • Keep inverter sizes down and use for short periods or your battery will go flat quickly. i.e. 150 to 300W[/*]
  • If you need more than 300W use a generator.[/*]
  • If you do use a generator or an inverter, your safest option is a Pure Sine Wave and stick with known brands that have national service and warranty. People usually don't find out that it doesn't work until they are in need of it.[/*]
  • Use an AGM in totally sealed environments.[/*]
  • Use a smart charger to charge deep cycle batteries.[/*]
  • Use the correct gauge wire for the job, circuit breaker or fuse everything properly.[/*]
  • If in doubt, ASK.[/*]
  • And, the number one first and last word 12VDC doesn't hurt 240VAC - KILLS. Even from an inverter.[/*]
 
Found something that I think is the "Bees Knees" of battery management. It is THE most user friendly, easy to use battery management system I've seen.
So good I bought one today.

Here are the details -

Their web page - https://teambmpro.com/au/shop/battery-check.html

The Android app - https://play.google.com/store/apps/details?id=com.setec.batterycheck

The Apple app - https://itunes.apple.com/th/app/batterycheck/id862806938?mt=8

I will be installing it in my caravan tomorrow, it should take all of 5 minutes, I'll post my pics and thoughts on how easy it is to use tomorrow night.

It is primarily for caravan and camper deep cycle batteries, I know it will work on my auxiliary in the 4x4 as mine is in the back of the car.
Not sure of its environmental limits under the hood.
 
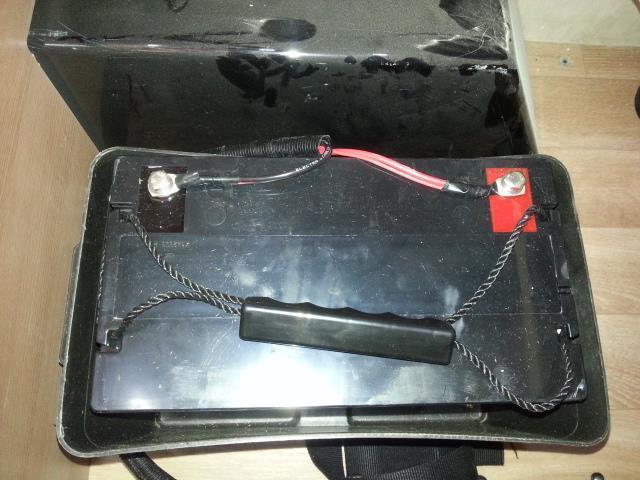
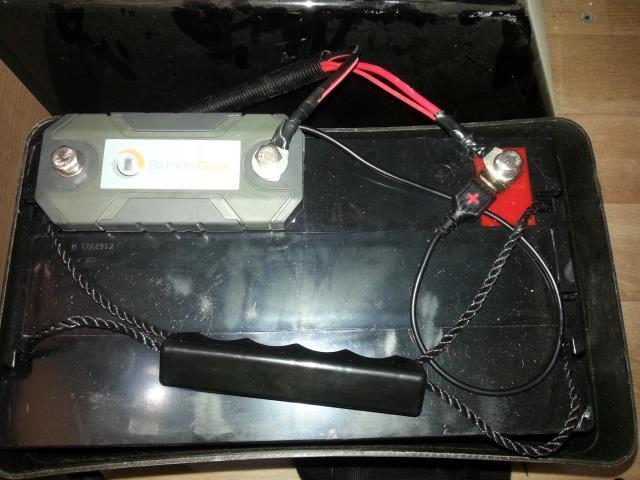
It took me longer to get the spanner from the shed than it did to install this device. The 2 pics are battery before and battery after install. I used the screw provided to fasten the unit to the negative terminal, then using the original screw on that terminal, reconnected the negative leads to the other end of the unit.
You can't get it the wrong way round, because one end is a clearance hole through to the threaded battery and the other end is threaded with the same 8mm thread as the battery.

1417051502_20141127_100421.jpg

1417051502_20141127_102304.jpg


Then it's take off the positive battery screw, add the fly lead from the unit to it and reconnect. The unit immediately powers with a flashing green LED. I had already downloaded the app last night, so opened it on my smart phone, it scans for the battery monitor, asks for the 4 digit passcode and connects.

Then into settings where I set the battery as NEW, the rating at 100AH, low capacity warning value (I set 50%) and what kind of alarm you want, low voltage value, I set 11.5V and what kind of alarm and save the settings.

When you turn on the charger or a load, there is a few seconds delay while the monitor communicates with my phone. It works out the charging rate and the load and depending on the values gives you the overall effect on the battery in amps and if it is charging or discharging, the voltage, battery health, state of charge and at current load, how long the battery will provide that load.

It really was "trained ape" easy to install and set up.

I then proceeded to switch on lights, TV, pump and fans etc and now have a list of exactly what item uses what power.

No extra cables, no soldering and because it's made in Australia, no Chinglish instructions. It works in up to 70 deg temp and it also monitors battery temp.

and yes $299 isn't cheap, but if you stuff a deep cycle AGM or 2, good ones invariably cost more.
 
The other advantage is that I did not have to drill any cable holes, mount any gauges, the van looks exactly as it was.

I also checked the range, it communicates with my phone at about 6M, so I don't have to get the key, open the van when in my driveway, I can check it from the bedroom window. :)

Also if you consider the overall cost of powering a caravan on battery; battery, charger, solar panel/s, solar controller, inverter, switching, cables and a few beers while installing, then this device is a smallish part of the overall.

And, that's before looking at a generator.

This device is another option I am presenting, again I have no affiliation with the company. It was my choice to buy one, it is your choice not to.
 
Fair enough C22, I like to keep things simple and don't like to over complicate things.
I use it like a fuel guage, when it is running down, top it up.
 
Yup, the other good thing about this thing is that it is Bi-directional, measuring in and out, where most others like the Powertech from Jaycar (I have 2 internal and 1 external shunt versions) only measure one way. So if you wanted to measure in and out you would need 2.
 
Here's another piece of info for you all;

My caravan has a 100AH Gel and a 20A smart charger. I ran it down to 75% (25 amps used) Then put it on charge with no loads running.
I started at 1220pm, its now 1620pm (4 hours) and the battery is now 92% charged according to my monitor.

So the Absorption phase slow down has kicked in.

4 hours for 17% charge and 8% to go. I'll post the total time to 100% when it has happened.

This simply states that a 20A smart charger wont recharge 20 amps in 1 hour especially for the last 20% or so of charge. They all do this.
 
Took 5 1/2 hours to fully charge,

Next test will be 80% charge and see what the solar panel will put in.

When opportunity allows
 

Latest posts

Top