HARD ROCK MINING on a tight budget: (1)

Prospecting Australia

Help Support Prospecting Australia:

This site may earn a commission from merchant affiliate links, including eBay, Amazon, and others.
Joined
Apr 20, 2013
Messages
1,811
Reaction score
2,058
Location
Central Vic'ish, VIC
Interested in taking a "cut" running some down holes for a "shaft sink", need to take a "part face" "inclining" 'declining" "portal" or "adit", all used in mining small or large scale.
So you have a wee mining lease, how can i go about knocking some rocks about without using ANFO, POWER GEL, TNT, DETS, EMULSION, simple "NON EXPLOSIVE CRACKING AGENTS", used in quarries and mining this product expands in drilled holes to crack the rock.
Its non explosive, environmentally safe, and whisper quiet.
So lets start with you have a small hard rock mining lease approved and your going to kick off with a shaft sink, working on the theory you have hit bedrock at 2 feet.
Firstly you need to bore holes, now were on a tight budget so a 100cfm commpressor and a SIG29 rock drill are out of the question, settle for a large rotary/demo drill normally you can pick these up for about 1k with 900mm x 30mm drill bits, firstly mark out your shaft size (keeping in mind you will need a section for an ore/waste pass)
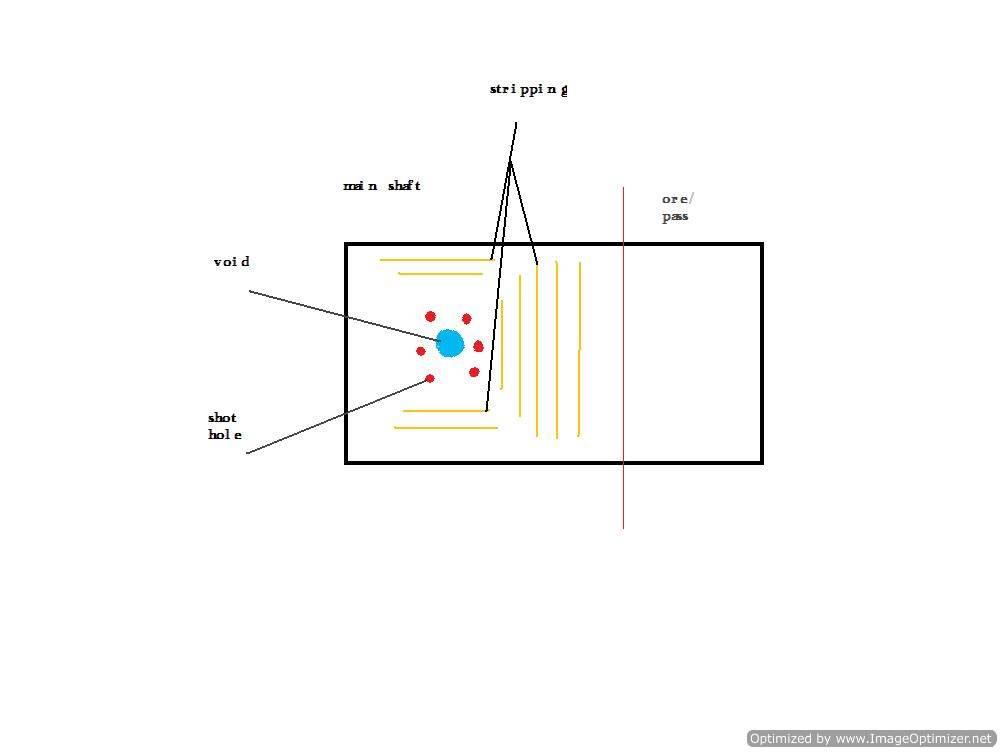
From the pic below you can see the blue hole which is referenced as void, this is the most critical part of any cut, firing, whenever you try to remove rock in its solid state you need an area for the rock to move to, hence the void, this can be achieved by boring holes in close proximity to each other and jack hammering out the centre (note: the hole dose not have to be neat or round it just needs to be a hole)
The red holes around the void are classed as "shot" holes, these when loaded with non explosive cracking agent will break into the void if you keep in mind that everything tries to take the easy way out, the point of least resistance, you will have no trouble in getting your head around how to break rock up.
The yellow lines are classed as stripping, this can be done by boring holes in similar fashion to your shot holes, or simply slicing the rock with a jack hammer, once again breaking the dirt into the area of least resistance, that being the void.
The red lines dsignates your ore/waste pass, we will get more descriptive on that later, you dont need to do anything here until your at a depth of head height, so strip out the rock to your desired width of the shaft.
1404345027_shaft_1-optimized.jpg

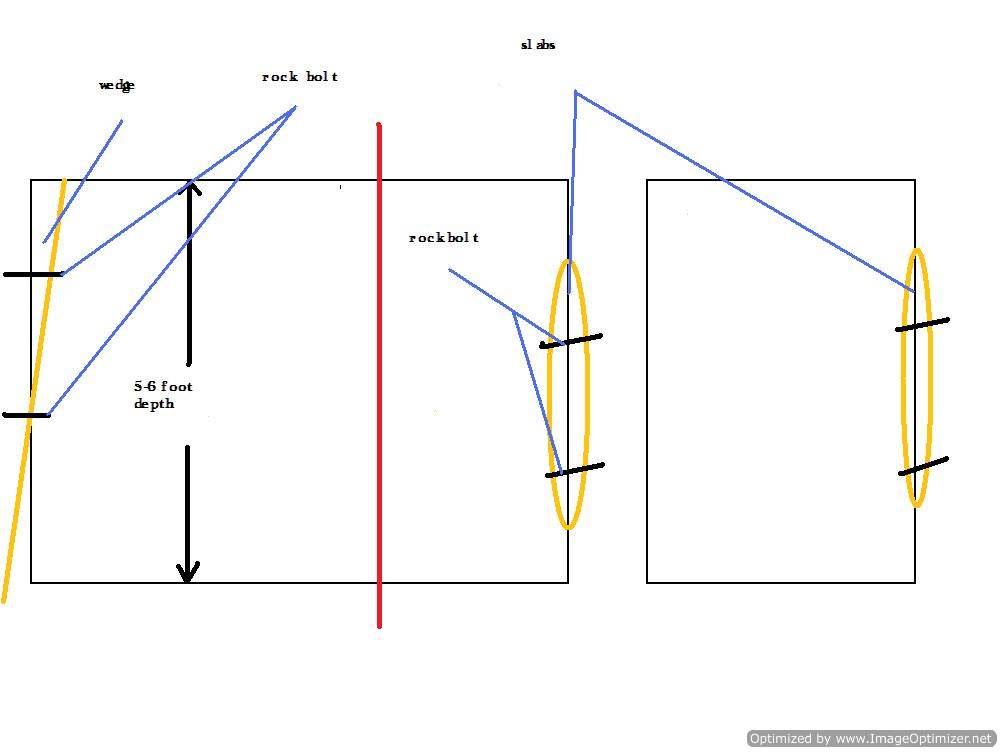
So now were at roughly 5-6 foot level, and we have hit a few snags, eg wedges and slabs, these suckers can and are lethal, to remove these can break open the shaft to a size that can and will compromise the integrity of our shaft, so by installing rock bolts we essentially are locking these rocks into position.
These can be purchased but are expensive, but are a necessity, approach a local mine about purchasing these, they have them in bundles so they will not be hard to acquire.
These are called "resin bolts" and "split sets", i would recomend the resin bolts they are a high tensile threaded bar that uses a two part epoxy resin to set at the rear of the hole, once the resin has "turned" the shear pin in the nut can be cracked and you can then tension the nut to pull the slab or wedge up tight locking it into place, note: if you do tension these resin bolts DO NOT over tension, by over tensioning you can compromise the effectivness of that particular ground support, the bolts have plates on the back of them, if the ground decides to move the plate will 'give" by this i mean bend, hence now loading up the bolt with weight and a perfect tell tale is a bent plate.
1404347566_shaft_1.5-optimized.jpg
 
Now lets have look at cutting in an Adit or Portal, unless you have a steep hill, with ground sloping away from where you plan on taking your first cut, you most likly will have to put in a box cut to get down to bedrock before you can start to take an adit or portal cut.(this will be looked at using a rock drill, good air supply and the use of explosives)
Box cuts that leed to portals can have serious expenses when it comes to small scale mining, earth moving gear big enough to hit your bedrock depth, which isnt to bad if your digging through ore on your way down, then battering the box cut, and dont forget about the elements, if it rains heavily in the area you have a lease you are going to want a serious pump set up to keep up with funneling water heading strait for your portal, once your in with a portal cut you will have to cut in a sump with a pump in it with enough grunt behind it to push the water out of your hole up the box cut to your silt/settling ponds.
We will take the easy option and assume your in hilly steep ground that slopes away from your proposed adit/portal cut, therefore negating the need for a box cut.
1404373597_adit_portal-optimized.jpg

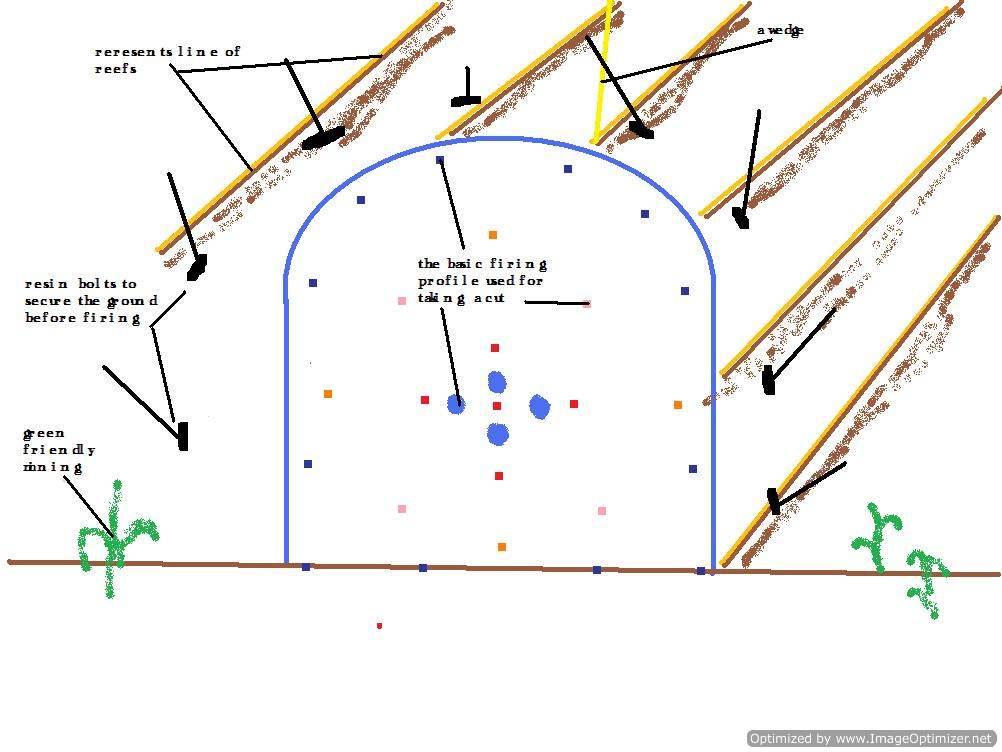
firstly lets look at the profile of the firing plan, this is a basic 101 of how and where to bore your holes to be able to take a cut.
Firstly bolt the ground with resin bolts to secure it in place before firing so you dont end up with a portal that was supposed to be be 2mt x 2.5mt, and now resembles a medievil amphitheatre. :eek: Pay close attention to look for wedges in the ground before firing, as they can fall well after the firing has been completed.
Once again the blue holes are voids, these are usually made by reaming steels from a rock drill.
The red holes are your shot sequence starting of with a number 0 detenator in the centre and working your way around the reamer holes to successfully enlargen the void, from expierences shared by other miners, some believe in a cork screw type of affect to help throw the dirt out of the hole, what you are looking for here is a much larger void to continue firing the rest of the shot into. Slightly looking these holes into the rear of the reamer hole will help assist in throwing the dirt out of the face (face meaning the rock).
Then continue firing the rest of the shot holes in sequence to continue firing into the viod,(spacing out your firing numbers allows enough time for the exploded rock to vacate, allowing the next shot to be taken.
Red hole centre of blue holes number 0, firing clockwise from the top red hole we would have a number 2, followed by a number 3 on the right red hole,a number 4 on the bottom red hole, and a number 5 on the left red hole, now leaving us with a much larger void.
Now that we have a larger void we jump out to the pink holes which we can see is shaped in a box, this can be fired in the one number by this i mean all number 6 or 7, by firing this in the same number at once it will smash the rock together helping it break up on its exit from the face, also making for easier removal once all firing complete.
Now move out to your orange holes, firing these at number 10, then finally finishing up with the perimeter holes firing at number 11 and lifters (lifters are the 4 blue holes on the bottom and should be fired last) firing these at number 12.
Once this has been completed check for misfires(explosives that did not detonate) and start bogging (digging) the dirt, the next phase is bolting.
 
Hi dwt,

Always been interested in how they do this, thanks for the post.

What about doing an open cut mine instead of a shaft?

Having zero experience in such matters to me it seems the safer option is that correct or am I barking up the wrong tree...or just barking :D

Cheers,

Grant
 
gcause said:
Hi dwt,

Always been interested in how they do this, thanks for the post.

What about doing an open cut mine instead of a shaft?

Having zero experience in such matters to me it seems the safer option is that correct or am I barking up the wrong tree...or just barking :D

Cheers,

Grant
Hey gcause, the environmental footprint of open cut can be huge compared to shaft sink or adit/portals, imagine taking an adit/portal cut in the side of a hill and moving your ore for processing, you could leave trees and other flora/fauna alone, there would be a small clearing for roads and what have you but other than that you wouldnt need to go clearing from one end of your lease to the other, the main purpose for this is your re-hab plan would be minimal, all leases have to have a re-hab plan in processes, so as a small scale mining operation you would be best keeping as little a environmental footprint as possible. Keeps the greenies happy too. ;)
As for the saftey side of your questions, one way is no more hazardous than the other, done the right way, with expierenced operators.
Complacency and inexpierence, the biggest danger with any job.
Hope this answers you questions mate ;)
 
Question on the non explosive agents, are these the expanding plasta/concrete stuff, or the airbag type setup?
As looking at your blast pattern, that would be a slow process in my mind to do with the expanding agents compared to the airbag options.
 
BrisJoe said:
Question on the non explosive agents, are these the expanding plasta/concrete stuff, or the airbag type setup?
As looking at your blast pattern, that would be a slow process in my mind to do with the expanding agents compared to the airbag options.
G'day BrisJoe, the non explosive agent im talking about is not the airbag its the agent that you mix with water (EXPANDO), (DEXPAN) the blast pattern of the adit/portal cut is for explosivies not non explosive agents, as for the airbag style you would need a void big enough to fit the airbag (one 30mm hole vs 25mm x however wide the bag is) you would need to have cut a slot in the rock to fit the airbag in.
The non explosive cracking agent i would use for the first part of a shaft sink until i got to some decent enough rock that could handle explosives(out of the sandstone bedrocks), and hopefully by that stage i would be well and truely on ore that would more than cover the expenses of having to start using explosives, this i will cover in some later posts :)

you can read all about non explosive cracking agents at this link ;)
http://www.expando.com.au/what-is-expando
 
I've always wanted to try the old way of cracking some rocks, stick a log down it and keep it damp ;)

Interesting stuff dwt!
 
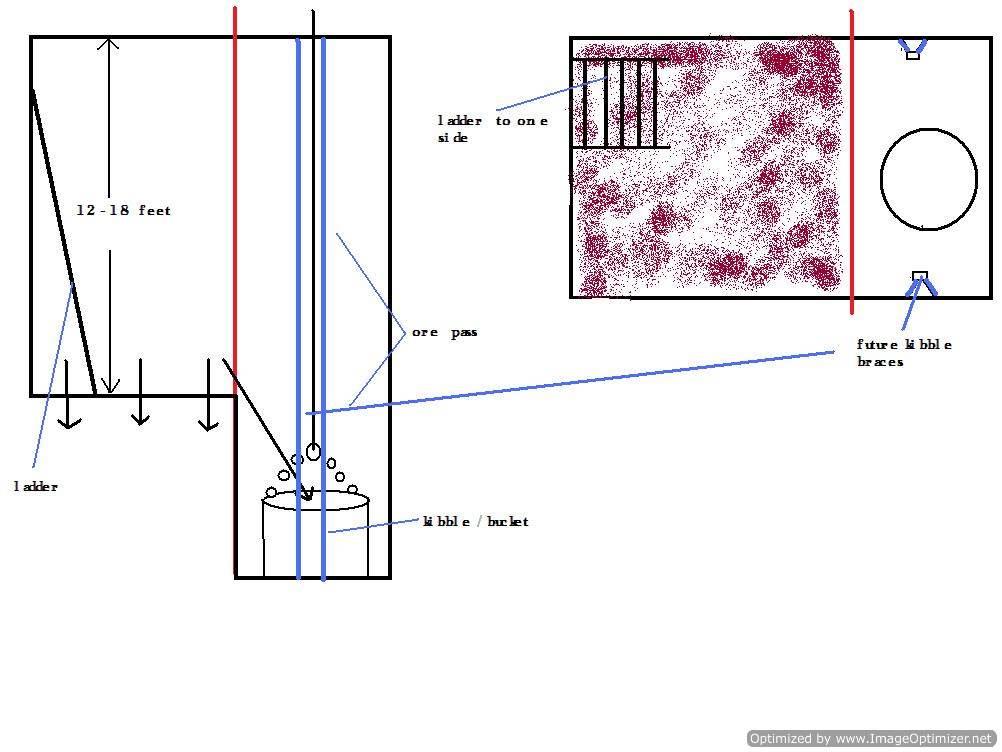
The next step we will look at is, the point and use of the ore/waste pass. By adding in an extra section when sinking our shaft we utilise this as our ore/waste pass, for demonstrative purposes, i have just drawn in a drum, if you wanted you could go the full hog with a head frame and full winch set ups, but as we are doing this on a budget, and we sank most of our coin into leasing and licensing fees :rolleyes: we dont have much to spare till we hit pay dirt, we can scoot along to a local engineering firm and get them to knock us up a winching system, or we can take a trip up to the opal fields and try and get our hands on a second hand self tipper.(this all would be pre planned in your work plan)
The principle behind having a ore/waste pass. We can sink one side at a time, the ore pass being of a smaller size we would sink first, having secured the kibble/bucket out of harms way, once we have sunk the ore/waste pass side down say some 4-5 feet we would then lower the kibble/bucket into the ore/waste pass side of the shaft and continue sinking whilst breaking the dirt directly into the kibble/bucket to save on double handling.
1404460547_shaft_2-optimized.jpg

As we go down we need to secure a means of egress/exit, by installing ladders, some mine sites have these in abundance, as there seems to be an emergency escapeway upgrade going on at the moment, so there is an abundance of caged and uncaged ladders floating around.If you know of some old contracting rise miners kicking about you could hit these guys up who would have more than a fair idea as to where you could locate some unused/unwanted ladderways.
Keep these to one side when installing as to allow yourself enough room to be able to work and turn around in your shaft.
The future kibble braces are simply when you have sank your shaft to its required depth, these act as guides for your haulage kibble to be able to move freely up and down the shaft without rotataing and becoming wegded, i have heard many a story of trajedy from men trying to clear a wegded haulage kibble. Get in early and plan your shaft before you start sinking, trying to fit this in at a stage when your 100feet down would be a nightmare.
The other benefit of an ore/waste pass is you are not working directly under the kibble, as for when your sinking the ore/waste pass, a bit of common sense and secure your kibble up top before you commence work. ;)
As your sinking, keep an eye out for small stringers (small narrow quartz offshoots) these can sometimes be rich with small fine gold and well worth sampling while your sitting up top having your crib (lunch) :D
 
Hi dwt,
Thanks for getting back to me on that. Another question from a complete noobie to this.

Apart from the bolts you mentioned for the larger rocks, what kind of shoring / lining would you need to put in for the shaft if the ground was not exactly stable ie loose gravels mixed in with the rock like a deep old river bed?

Cheers,
Grant
 
gcause said:
Hi dwt,
Thanks for getting back to me on that. Another question from a complete noobie to this.

Apart from the bolts you mentioned for the larger rocks, what kind of shoring / lining would you need to put in for the shaft if the ground was not exactly stable ie loose gravels mixed in with the rock like a deep old river bed?

Cheers,
Grant
good point mate, i would be using 50mm square gal mesh and "split set's" these are a thin tube with a split down the side and a hollow metal ring welded to the end a slightly smaller hole is drilled, stand the mesh up and lock the split set mesh to the ground via a rock drill and a item called a dolly, i have also seen these dolly's made up for jackhammers, the split set is basically hammerd in like in a nail, if the ground was a deep river bed with a mix of small river pebble and large rocks 50mm square mesh would be my choice, larger slabby ground, you can move up to 100mm gal mesh.
Running split sets is quite easy and quick compared to resin bolts, but the resin bolt will hold more weight by up to 7 plus tonne.
I will be more descriptive on this in the next post of our shaft sink. ;)
 
Thanks for sharing the video dwt pretty amazing how quick those rock drills are at cutting through the rock.

Gee I bet the old timers wished they had that gear :D

I can't believe how much they accomplished with just hand tools and timber shoring.
 
BrisJoe said:
Would Chemset be a suitable alternative for holding the bolts in place?

Yeah mate, chemset (resin bolts) the video dosnt really show it to well, but the backs have rows of 3 in them,1.5mtr splitt sets in the wall below shoulder height are more than enough to hold for a 3-4mtr stope shot, if in the case of "benching" you would be running resin bolts down to grade line. :)
 
awesome .

whats the rules for hole placement if you have fissures in the wall ?

do you put bolts in the fissure as well or always towards the center of the biggest blocks ?

do you use earplugs and earmuffs at the same time ?

are the drill bits tungsten button bits only ?

you work hard for the money mate . onya.

:D
 
HeadsUp said:
awesome .

whats the rules for hole placement if you have fissures in the wall ?

do you put bolts in the fissure as well or always towards the center of the biggest blocks ?

do you use earplugs and earmuffs at the same time ?

are the drill bits tungsten button bits only ?

you work hard for the money mate . onya.

:D
G'day mate, there is always a bolting plan for the heading you are going to , the plan is the bare minimum for bolting the heading, they are set up on a perfect cut profile scenario, which is 1.8mtrs in width x 2.8mtrs in height, (these do vary from mine to mine) with an arch profile.
But with gold ore (in places i have worked) predominatley running in puggy, generally crap ground, the cut can blow out so extra bolting is needed, this is at the dicression of the miner/operater and must be logged for submission at the end of shift. These are then inspected at the earliest stage and if extra bolting is required eg resin bolts/cable bolts, then a follow up plan is released by the rock mechanics.
Top quality ear plugs only mate(personal choice), but sometimes if you want to rock away to a bit of "RAMSTEIN" or "FIVE FINGERD DEATH PUNCH" while your drilling holes than noise cancelling ear muffs are the shizz. :cool:
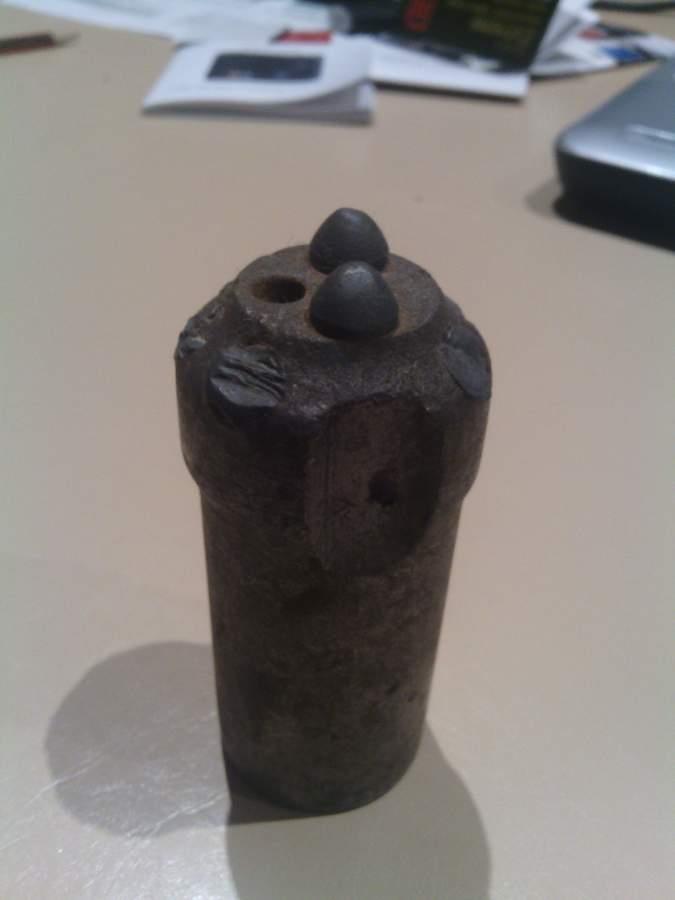
Below is a "button knock on bit" this one is a 38mm its my first ever bit i used drilling into gold rich quartz, 6 inches into the hole and this is what happend :rolleyes: , tore the tungsten buttons clean off, i then had to go to X cut bits, i soon learnt not to hang onto the drill to much after using a 38mm X cut bit and SIG29 rock drill, it was like holding onto a CR 500 with a bent crank shaft at peak revs, arm pump like a mutha fluffa.
Quartz is super abrasive brittle and hard, button bits like this one dont last long at all.

1404544440_002-optimized.jpg

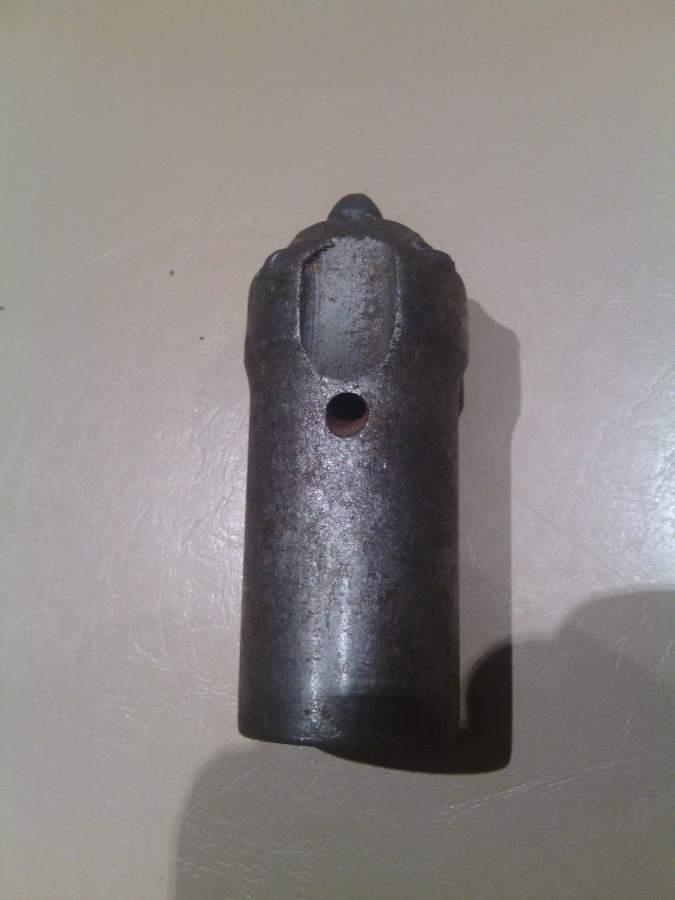
These bits have a reverse flushing hole which is a god send, for flushing out the hole while your drilling ;)
1404545601_003-optimized.jpg
 
mbasko said:
Nothing against Chemset but for this I would use specialty resin anchor bolts if you wanted a chemical anchor for example:
http://www.dsiminingproducts.com/ds...s/rock-bolts/solid-bar/high-strength-bar.html

They could also advise on bolt size etc. to suit the strata conditions. Even though this is aimed at a budget type set up - strata management isn't an area I would scrimp too much on. If I can find them I will post some pics of when things get too heavy. :D

Yep thats them mate, few different names and styles getting around, "resin bolts", "chemi anchor bolts", "wiggle bolts", "jumbo resins", and my favourite "oh these bloody things again, must mean were in some sh#t ground boys" :D
 
dwt said:
and my favourite "oh these bloody things again, must mean were in some sh#t ground boys" :D
:lol:
Good thread dwt. I've mostly been around U/G coal so reading the hard rock perspective is great - similar but very different at the same time I s'pose. We bring in or have specialist support teams that do our bolting - probably what you do I guess.
They do work hard - had some lads putting up 8m strands with a Rambor last week cause they couldn't get an airtrack or LHD with a QDS bolter in to do it. They had to carry everything in then put the bolts in by hand with the Rambor. I take my hat off to them blokes - hard yakka in trying conditions.
 

Latest posts

Top